
In my last column, I told you about an inexpensive procedure for mounting your deer, antelope and elk antlers that I had seen at a sports show in Great Falls and included a picture of Butch Kallem with a set of deer antlers he mounted.
Two weeks ago, I called Butch at his shop in Ulm, Mont. and told him I wanted to know more about the process. I had a set of antlers from a whitetail buck my son, Bill, shot last year and wanted to see them mounted.
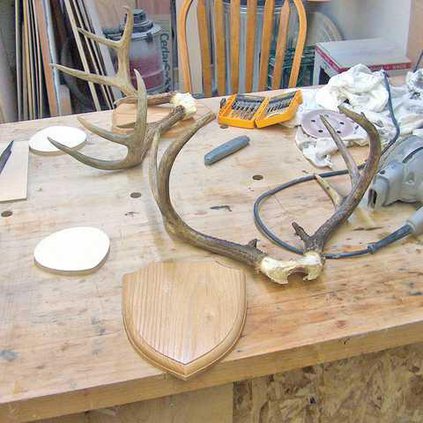
The next day, I met Butch at his shop and he had two mounting kits laid out — one for me and one for himself. Butch said the first order was to make sure that all skin and hair was removed from the antlers and they were clean.
Next, we sprayed the antlers with WD-40. Butch said this served two purposes: One was to give the antlers a shine, and secondly if we got any plaster on the antlers it would be easier to remove.
Then we placed the antlers on a piece of plywood called the horn cap. Butch said this was the most important step in the mounting, and the antlers must be square and level with the top of the cap.
In checking my antlers, I found that I needed to trim a little of the back of the skull cap on my antlers so they would lean a little forward. Also, I needed to take a little of the right side so that so that the antler buttons were the same distance from the horn cap.
After getting the antlers square with the cap, I drilled two holes in the skull cap and screwed it to the horn cap provided with the kit.
Butch said we were now ready to mix the plaster and cover the horn and skull cap. The instructions said that for a deer or antelope; mix three cups of the plaster in a disposable container until the mix was the consistency of peanut butter.
Next, cover the cap with the plaster until it was flush with the edge of the plywood.
I asked Butch about the plaster and he said he tried several different combinations before and this one was the best. Butch said just straight plaster would chip and not hold the screws. After letting the plaster cure, we started shaving the rough edges of the cap.
Butch said you want the cap as smooth as possible so that the leather covering would slide.
After sanding and shaving the cap, I started covering the cap with the leather and by taking my time and pulling all of the wrinkles, it looked pretty. You will need to take extra care when working around the antler base.
When you get to the back, cut the leather right behind the antler base so that it will be hidden. If you look a little ahead in the instructions, you will see that the base of the antler and the joint behind is covered with a braided leather piping.
After stapling the leather covering down, we placed the antlers on the plaque to see who it would look. There were a few puckers in the leather on the back of the cap so I shaved them off with a razor blade to that the antlers would lay flat against the plaque. After I way satisfied with the look, I screwed the cap to the plaque.
Now, I would not say that my completed mount would take first place at our local sports show, only that it would not be in last place. If you are wondering how long it took to complete, it took six hours, including waiting for the plaster to cure.
After looking over the instructions included, I have no doubt that by taking a little time; anyone could complete their own mount.
I asked Butch about the cost, and he said the complete kit cost $39 plus shipping and handling. If you are interested, you can contact Butch at 406-866-3198, or by mail at Wildwood Mfg. PO box 104 Ulm, Mt. 59485. You can also visit www.wildwood-manufacturing.com, or e-mail bkallem@mt.net
To reach Wayne Daniels, e-mail wdgonefishing2@aol.com.
Two weeks ago, I called Butch at his shop in Ulm, Mont. and told him I wanted to know more about the process. I had a set of antlers from a whitetail buck my son, Bill, shot last year and wanted to see them mounted.
The next day, I met Butch at his shop and he had two mounting kits laid out — one for me and one for himself. Butch said the first order was to make sure that all skin and hair was removed from the antlers and they were clean.
Next, we sprayed the antlers with WD-40. Butch said this served two purposes: One was to give the antlers a shine, and secondly if we got any plaster on the antlers it would be easier to remove.
Then we placed the antlers on a piece of plywood called the horn cap. Butch said this was the most important step in the mounting, and the antlers must be square and level with the top of the cap.
In checking my antlers, I found that I needed to trim a little of the back of the skull cap on my antlers so they would lean a little forward. Also, I needed to take a little of the right side so that so that the antler buttons were the same distance from the horn cap.
After getting the antlers square with the cap, I drilled two holes in the skull cap and screwed it to the horn cap provided with the kit.
Butch said we were now ready to mix the plaster and cover the horn and skull cap. The instructions said that for a deer or antelope; mix three cups of the plaster in a disposable container until the mix was the consistency of peanut butter.
Next, cover the cap with the plaster until it was flush with the edge of the plywood.
I asked Butch about the plaster and he said he tried several different combinations before and this one was the best. Butch said just straight plaster would chip and not hold the screws. After letting the plaster cure, we started shaving the rough edges of the cap.
Butch said you want the cap as smooth as possible so that the leather covering would slide.
After sanding and shaving the cap, I started covering the cap with the leather and by taking my time and pulling all of the wrinkles, it looked pretty. You will need to take extra care when working around the antler base.
When you get to the back, cut the leather right behind the antler base so that it will be hidden. If you look a little ahead in the instructions, you will see that the base of the antler and the joint behind is covered with a braided leather piping.
After stapling the leather covering down, we placed the antlers on the plaque to see who it would look. There were a few puckers in the leather on the back of the cap so I shaved them off with a razor blade to that the antlers would lay flat against the plaque. After I way satisfied with the look, I screwed the cap to the plaque.
Now, I would not say that my completed mount would take first place at our local sports show, only that it would not be in last place. If you are wondering how long it took to complete, it took six hours, including waiting for the plaster to cure.
After looking over the instructions included, I have no doubt that by taking a little time; anyone could complete their own mount.
I asked Butch about the cost, and he said the complete kit cost $39 plus shipping and handling. If you are interested, you can contact Butch at 406-866-3198, or by mail at Wildwood Mfg. PO box 104 Ulm, Mt. 59485. You can also visit www.wildwood-manufacturing.com, or e-mail bkallem@mt.net
To reach Wayne Daniels, e-mail wdgonefishing2@aol.com.

